We have updated the content of our program. To access the current Software Engineering curriculum visit curriculum.turing.edu.
Express
Learning Goals
- Understand when and why to use Express.js (Express) in the back-end of an application
- Know how Express abstracts difficult server-side logic and makes it easier to write endpoints
- Create a simple Express app that implements all of the basic CRUD methods
Vocabulary
- HTTP request/response cycle
- server
- client
- middleware
- route
- route handler
- CRUD
Prework
Download Postman and watch this video.
To download Postman:
- Check your Mac’s chip type by searching
About This Macwithcmd + spacebar - Choose the correct Postman download at this link.
Most likely you will have a Mac M1 chip and will download the version for “Mac Apple Chip”.
What is Express?
Express is a small framework built on top of the web server functionality provided by Node.js. It helps to simplify and organize the server-side functionality of your application by providing abstractions over the more confusing parts of Node.js, and adding helpful utilities and features.
Why do we use Express?
The syntax for using the plain Node http library (allowing us to write JS for back end work, aka server-side JS) isn’t the friendliest or easiest to maintain. Node gives you enough low-level features to build the back-end of an application, but Express is a light layer built on top of Node to make these low-level features a little easier to read and write.
Advantages of Express
While Node’s http library provides us with all of the functionality we need for our back-ends, writing this logic without Express is more difficult to make sense of and maintain. The two biggest advantages of Express are:
- The collection of helpful utilities and conveniences that abstract away the Node.js complexity. (e.g. sending a single image file in a response with only raw Node
httpis quite complex, but can be done in just one line with Express) - The ability to refactor route handlers into smaller pieces that are more modular and maintainable. (Node
http, by default, requires you to create one large route handler, which makes your logic more rigid and difficult to refactor)
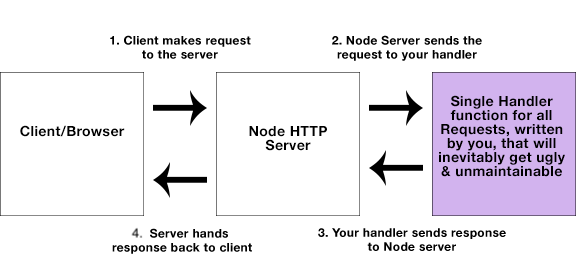
Request Flow
When we are just using Node.js, the flow of a single request might look like this:
When we add Express, there are a couple of additional steps added to the flow of a request:
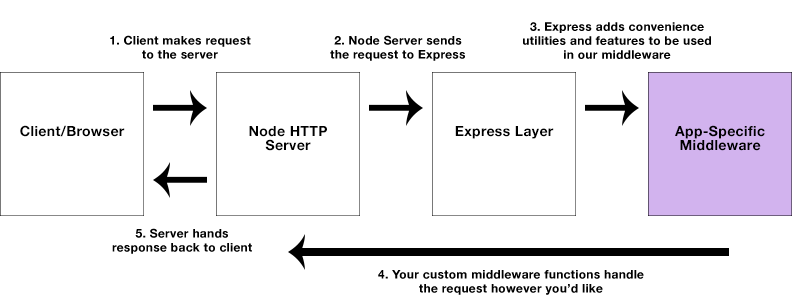
While the Express flow might look more complex, it actually makes the developer’s job a lot easier. In this flow, the developer is only responsible for the “Middleware” part of the process. This replaces the single route handler function that you would write with only Node http. Writing middleware for Express is a lot easier to write and more maintainable because of the “Express” step that abstracts the complex logic for us.
Routing & Middleware
Earlier we mentioned that with plain Node http, you would create a single function to handle requests. This single function can get large and unwieldy as your application grows in complexity. Express middleware allows you to break this single function into many smaller functions that only handle one thing at a time.
Most of the Express code that you write will be routing middleware. Middleware is basically the “glue” between two systems that helps them work together (in our case, Node and Express). Our code will be concerned with responding to client requests to different URLs with different methods (GET, POST, etc).
Let’s pick apart the structure of how we define an Express route:
app.get('/', function (request, response) {
  response.send('Hello World!');
});
In the above example, our express app (denoted by app), is handling a GET request to '/'. The second parameter in this call is our callback that defines how we’re actually going to handle what happens when a user makes a GET request to '/'. The callback takes two parameters: the request (req) and the response (res). In this example, our handler is simply sending back a response (res.send) with the text ‘Hello World!’.
This pattern is exactly how we can define and handle any routes in an Express application. There are four main pieces to this code:
app- the instance of our Express application- a METHOD - the method specified when the request is made from the client. (e.g.
GET,POST,PUT,DELETE) - a PATH - the endpoint that we are requesting
- a HANDLER - the function we write that contains the logic for how the request should be dealt with, and what kind of response it should return
Getting Started with Express
Let’s go ahead and install some dependencies that we’ll need to get things rolling.
mkdir pet-box && cd pet-box
npm init --yes
npm i express --save
touch server.js
We’ll get a basic server running using some code I stole from the Express documentation and modified slightly to fit my tastes.
const express = require('express');
const app = express();

app.set('port', process.env.PORT || 3000);
app.locals.title = 'Pet Box';

app.get('/', (request, response) => {
  response.send('Oh hey Pet Box');
});

app.listen(app.get('port'), () => {
  console.log(`${app.locals.title} is running on http://localhost:${app.get('port')}.`);
});
Starting the Server
You can fire up your server using node server.js and visit http://localhost:3000/ to enjoy in the fruits of your copy and pasting labor.
OR…
If you don’t have nodemon installed globally, now might be a useful time to do that. Nodemon will auto-restart your server for you any time you make changes to your server file (hot-reloading). When starting an app with node, you would have to manually shut your server down and spin it up again to see your most recent changes reflected.
npm i -g nodemon
nodemon server.js
A Simple GET Request
We’ve already made one GET request, that’s simply returning some text. Let’s make another one using some actual data that will return JSON for us.
For now, we’ll store an array of pets in a variable called app.locals, which is an object automatically given to us through Express:
app.locals.pets = [];
You can think of app.locals as something similar to a component’s state in React! It resets every time the server refreshes and does not persist (for true server-side data storage, we would use a database).
Let’s put some fake data in for now:
app.locals.pets = [
  { id: 'a1', name: 'Jessica', type: 'dog' },
  { id: 'b2', name: 'Marcus Aurelius', type: 'parakeet' },
  { id: 'c3', name: 'Craisins', type: 'cat' }
];
The GET request:
app.get('/api/v1/pets', (request, response) => {
  const pets = app.locals.pets;

  response.json({ pets });
});
Note
response.jsonis just a short hand for setting the response type asapplication/json.- It automatically serializes our object as JSON.
Making a Dynamic Route
Let’s say we wanted to get a specific pet based on its ID. We want anyone to be able to retrieve a single resource by indicating the ID associated with the object they want to retrieve. In order to do this, we must add a dynamic portion to our URL.
Consider the following:
app.get('/api/v1/pets/:id', (request, response) => {
  response.json({
    id: request.params.id
  });
});
Take that for a spin with a bunch of different words where :id should go.
Here is the feature we want to implement: when a user requests a pet by its id, we want to return that pet’s pet and id.
How can we return the pet that matches the id in the response?
app.get('/api/v1/pets/:id', (request, response) => {
  const { id } = request.params;
  const pet = app.locals.pets.find(pet => pet.id === id);

  response.status(200).json(pet);
});
Let’s go ahead and take this for a spin. It kind of works. If they give us the right id, they’ll get the pet. But they don’t get an error if they give us an invalid id. It would be preferable to send them a 404 status code, which let’s the browser know that the resource was not found.
With Error Handling
app.get('/api/v1/pets/:id', (request, response) => {
  const { id } = request.params;
  const pet = app.locals.pets.find(pet => pet.id === id);
  if (!pet) {
    return response.sendStatus(404);
  }

  response.status(200).json(pet);
});
Note
Notice the slight difference between the status and sendStatus methods in the docs.
Sending Data With A Post Request
It would be cool if we could create pets in addition to just being able to retrieve the prepopulated ones.
You’ll need the following line so that your app parses the request body to json by default.
app.use(express.json());
This will add in support for parsing JSON.
Creating a POST Route
First, lets pseudocode out the steps of what we’re trying to accomplish here. If we want to make it possible for new pets to be POSTed, we will need to:
- Get the new pet’s name and type from the request body sent by the front end.
- Create an id for our new pet. We’ll use our super secure method of generating random IDs - Date.now()
- Put those 3 data points into an object
- Add that new object to our pet’s array
- Send a response with the proper status code and the new pet object
### Let’s turn it into code
```js
  app.post('/api/v1/pets', (request, response) => {
    const id = Date.now();
    const { name, type } = request.body;

    app.locals.pets.push({ id, name, type });

    response.status(201).json({ id, name, type });
  });
```

IMPORTANT NOTE: this approach has a few of flaws.

- We're storing data in memory, which will be wiped out when the server goes down.
- Multiple pets could have the same time stamp. Something like [nanoid](https://github.com/ai/nanoid/) would be better for id generation.
The Sad Path
What happens if the user doesn’t give us a name or type parameter?
We should tell them that we got some bad data.
In our previous example, we simply stored a new pet object that we received from the client-side and sent it back as a successful response. When we successfully create a new record in a collection of application data, we can signal this success to our end-user by setting an HTTP Status Code. There are many different status codes to use in various situations. Upon a successful ‘creation’ you’ll want to set the status code to 201 before sending back the response object.
Take a minute to look through some of the other available status codes that can be used. These are a quick way to determine what happened to our request when it was sent to the server, and are easily viewed in the ‘Network’ panel of your browser developer tools.
Status codes are especially important when handling errors for a request. Let’s add some error handling to our previous example. We are going to assume that both ‘name’ and ‘type’ are required properties when submitting a new pet, and we want to respond with an error if one of them is missing:
POST with Error Handling
app.post('/api/v1/pets', (request, response) => {
  const id = Date.now();
  const pet = request.body;

  for (let requiredParameter of ['name', 'type']) {
    if (!pet[requiredParameter]) {
      response
        .status(422)
        .send({ error: `Expected format: { name: <String>, type: <String> }. You're missing a "${requiredParameter}" property.` });
      return
    }
  }

  const { name, type } = pet;
  app.locals.pets.push({ name, type, id });
  response.status(201).json({ name, type, id });
});
Consider: What would happen if we didn’t have the return in the if statement?
If either property is missing, we will see an error in the Network tab of our developer tools where the response is highlighted in red and has a status of 422 (client error). The response details will tell us exactly which property we are missing based on the error we sent along with the 422 response.
It’s important to handle errors and write descriptive error messages so that others can more easily debug their code and quickly fix whatever problem they are running into. Setting appropriate status codes and being as specific as possible with the response pet is the best way to write a user-friendly API.
Using Postman
Postman is a super cool tool for sending requests to endpoints. You can use Postman to add, edit, or delete data if there isn’t a UI to do so. In our case, it’s handy to add pets, edit a specific pet, or delete a pet. Get familiar with Postman because it will be your best friend for all things API from here on out.
Things to consider:
- If you are including information in the body of the request, then one of the headers needs to include
Content-Type: application/json - Remember to check which HTTP method you are using before sending the request
Student Exploration (10 mins)
- Implement a PATCH route for a specific pet to edit the name of the pet
- Implement a DELETE route for a specific pet to remove it
- BONUS: Can you implement a GET route that shows only the pets that have been edited?
Static Files in Express
To serve static files like an index.html file, you need to let Express know. To do this, tell Express what directory your static files live in with:
app.use(express.static('public'));
This chains public to the root path. A good practice is to name this directory public if it contains public facing files such as HTML, CSS and JS.
We then send our response using the static asset Express middleware. That’s it!
app.get('/', (request, response) => {
  // response is actually handled by static asset express middleware
  // defined by app.use(express.static('public'));
});
Express assumes a structure for our static assets. The response for the root path, '/' or localhost:3000/, first goes to the root of the public directory and looks for a file called index.html.
So now you can add a directory called public and in that directory add a file called index.html with some basic HTML. Restart the server, head over to localhost:3000, and you should see your HTML file being served.
CORS
Cross Origin Resource Sharing (CORS) is a protocol that allows restricted resources on a web page to be requested from another domain outside the domain from which the first resource was served. This is in place for security reasons.
By default the CORS policy in express apps prevents you from making api calls from other domains. In order to allow api calls from other domains you need follow these two steps:
- Install cors as a dependency
npm install cors - Near the top of the file, pull in the dependency
const cors = require('cors'); - Insert this config line into your server file:
app.use(cors());
Without it, you will get cors errors if you try to make a request from a react repo hosted at another domain. ie. trying to make requests from http://localhost:3000 to http://localhost:3001
Incorporating babel
Babel is a compiler that takes newer flavors of javascript and turns it into more compatible code.
By default, create-react-app pulls in babel so that we can use more modern javascript feature such as importing and exporting. If we want to be able to use import export statements, we’ll manually have to pull in babel. Let’s do that.
First, let’s install the dependencies we’ll need for development:
npm install --save-dev @babel/core @babel/preset-env @babel/node
Next, we need a .babelrc file in our root to define how to compile our code.
Inside of that file, add these contents:
// .babelrc
{
  "presets": ["@babel/preset-env"]
}
Now, we can add a start script so that when we start our development server, it’ll use babel to compile our code into something node can understand.
Add nodemon --exec babel-node server.js as the start script.
When you’re all finished, your package.json should look something like:
{
  "name": "pet-box",
  "version": "1.0.0",
  "main": "server.js",
  "license": "MIT",
  "dependencies": {
    "express": "^4.16.4"
  },
  "devDependencies": {
    "@babel/core": "^7.2.2",
    "@babel/node": "^7.2.2",
    "@babel/preset-env": "^7.3.1"
  },
  "scripts": {
    "start": "nodemon --exec babel-node server.js"
  }
}
You should be able to use imports/exports now and when you run npm start it’ll work error free!
For more details on how to update your other scripts to use babel, check out this article.
Checks For Understanding
- In as much detail as possible, explain what Express is and why we use it.
- What would the CRUD endpoints be for a data structure that was an array of
todoobjects? Eachtodoobject has anidand ataskproperty. - What do the 2xx level status codes represent? 4xx?