We have updated the content of our program. To access the current Software Engineering curriculum visit curriculum.turing.edu.
Advanced Git Workflow
Goals
By the end of this lesson, you will:
- understand how to create and use git hooks to automate common developer workflow processes
- know how to amend commits and squash others through interactive rebase
- be able to stage changes in patches rather than all at once
- understand when it’s ok to rewrite history and the potential downfalls that occur when others are relying on your code
Git Hooks
As developers, we’re constantly looking for ways to automate tedious tasks. We’re essentially trying to put ourselves out of work by writing scripts that will complete tasks for us. Let’s talk about git hooks.
Git hooks are custom scripts that you can write to execute particular tasks during certain points of the git workflow process. They let you interrupt the flow of a git event – such as a commit – to do things like verify that the code you’re committing is linted and tested. They can be written in any language understood by the terminal (bash, node, ruby, python, etc.) When used in conjunction with other workflow tools and processes, you can create some really seamless patterns for maintaining any kind of codebase.
Similar to the lifecycle methods in React or other JavaScript frameworks, you’ll recognize some lifecycle patterns within the git version control system. For example, every time we make a commit, there are four distinct phases:
pre-commit- runs before the commit is even attempted, can be used to do a quick QA evaluation on the code that’s about to be committedprepare-commit-msg- runs before the commit message is made but after a default message is created, e.g. merge commits are auto-generated and can be adjusted at this point in the cyclecommit-msg- runs after the commit message has been made, can be used to verify that your message follows a required pattern (e.g. capital first letter, no punctuation, command-style sentence)post-commit- runs after the entire commit process is completed, can be used to run another script based on information from the most recent commit
Git hooks allow us to effectively ‘pause’ the commit cycle at each of these four phases. There are additional hooks for facilitating a custom email workflow and manipulating other git actions such as rebasing. These aren’t used quite as often as the commit hooks, but it’s good to be aware they exist.
Why?
On your own, write down why this might be useful as part of your workflow? After you are done, discuss your thoughts with the person next to you.
The .git Directory
Whenever we create a new local git repo, a .git directory is included in our project. This is where our git hooks live! The .git directory holds all sorts of secrets and goodies related to the version control process for our project. It maintains an immense amount of information, including all the deltas and changesets you’ve ever made. So even if you delete a commit or think you’ve lost some important code, never fear – you can always jump into the depths of the .git directory and retrieve it. (If you’ve ever committed your node_modules directory, you’ll notice all of your clones and pulls are incredibly slow because that changeset still exists in the history somewhere, even after you delete it.)
Creating a pre-commit hook
If we were to cd into .git/hooks we can actually see a couple of sample hooks that git provides us with by default. You’ll notice the filenames all end with .sample. This is what’s preventing them from actually running. If we want to implement one of these hooks, we could simply remove the .sample suffix.
Pre-Commit: Testing
Let’s rename pre-commit.sample to pre-commit and open it in your text editor. We’re going to create a pre-commit hook that prevents us from committing code that doesn’t conform to our linting and testing standards. We’re not going to use any of the example functionality that was included, so we can remove everything in this file and replace it with the following:
#!/bin/sh

echo "\Running tests:\n"

npm run test --silent
Now if we have a failing test, our pre-commit hook should catch that and prevent the commit from going through. This hook is super simple right now, because a failing test automatically causes the process to exit with an error.
Pre-Commit: Linting
If we were to add linting to this hook:
#!/bin/sh

echo "\Running tests:\n"

npm run test --silent
npm run lint --silent
Pre-Commit: Console.Logs/Accepting User Input
We might also want to check for console.logs or debugger statements in our code before committing, because embarrassing things like this might happen. Sometimes (though rarely), you might actually want to include an intentional console.log. With the following script, we can allow users to choose whether or not to continue with the commit if any logs are detected:
#!/bin/sh
#
# An example hook script to verify what is about to be committed.
# Called by git-commit with no arguments.  The hook should
# exit with non-zero status after issuing an appropriate message if
# it wants to stop the commit.
#
# To enable this hook, make this file executable.

# This is slightly modified from Andrew Morton's Perfect Patch.
# Lines you introduce should not have trailing whitespace.
# Also check for an indentation that has SP before a TAB.

if git-rev-parse --verify HEAD 2>/dev/null
then
  git-diff-index -p -M --cached HEAD --
else
  # NEEDSWORK: we should produce a diff with an empty tree here
  # if we want to do the same verification for the initial import.
  :
fi |
perl -e '
    my $found_bad = 0;
    my $filename;
    my $reported_filename = "";
    my $lineno;
    sub bad_line {
  my ($why, $line) = @_;
  if (!$found_bad) {
      print STDERR "*\n";
      print STDERR "* You have some suspicious patch lines:\n";
      print STDERR "*\n";
      $found_bad = 1;
  }
  if ($reported_filename ne $filename) {
      print STDERR "* In $filename\n";
      $reported_filename = $filename;
  }
  print STDERR "* $why (line $lineno)\n";
  print STDERR "$filename:$lineno:$line\n";
    }

$last_line = "";
    while (<>) {
  if (m|^diff --git a/(.*) b/\1$|) {
      $filename = $1;
      next;
  }
  if (/^@@ -\S+ \+(\d+)/) {
      $lineno = $1 - 1;
      next;
  }
if (/^ |\+/) {
  if(($last_line . $_) =~ m/,[\s+]*}/) {
    bad_line("trailing comma", $last_line . $_);
  } $last_line = $_;
}
  if (/^ /) {
      $lineno++;
      next;
  }
  if (s/^\+//) {
      $lineno++;
      chomp;
      if (/\s$/) {
    bad_line("trailing whitespace", $_);
      }
      if (/^\s* \t/) {
    bad_line("indent SP followed by a TAB", $_);
      }
      if (/^([<>])\1{6} |^={7}$/) {
    bad_line("unresolved merge conflict", $_);
      }
      if (/ruby-debug/) {
    bad_line("debugger breakpoint left in", $_);
      }
      if(/debugger/){
    bad_line("debugger breakpoint left in", $_);
      }
      if (/console\.log/) {
    bad_line("console logging left in", $_);
      }
  }
    }
    exit($found_bad);
'
Note: In order for a hook file to run, it must be made executable. You can make a file executable by running:
chmod +x hooks/filename
Sharing Hooks
By default, git hooks exist in the .git/hooks directory of your local repo. You’ll notice that this isn’t a directory that gets pushed to github, so when new contributors pull down your repo, they won’t have the same hooks in place that the rest of the team might be using. There are a couple of ways to get around this.
As of Git 2.9, you can set a git configuration option core.hooksPath that will override the default .git/hooks directory. This would allow you and your team to put your hooks in an internal, standalone repository that each developer could clone down and reference with the core.hooksPath option.
In earlier versions of Git, you could implement this same strategy by creating a symlink from the .git/hooks directory to your local repository of your team’s git hooks.
Both of these strategies can be facilitated by a library like git-validate. With git-validate, you can create a separate repository to hold things like a common linting configuration and rules for your pre-commit hooks.
On Your Own
A a pre-commit hook to your Palette Picker that will test for console logs.
Amending Commits
After making a commit, if you realize you want to add another change to that commit or have some code changes that you want to modify, you can stage your new changes and instead of creating a new commit for them, you can edit the previous commit with git commit --amend (Alternatively, if you would just like to edit the message, you can run git commit --amend -m "Your message here")
This will add any staged changes to the previous commit, and open up the commit message for an opportunity to modify that as well. It’s important to note that this feature rewrites history. Because you’ll be amending a pre-existing commit, it will change the unique SHA (identifier) of that commit. If anyone else has based work off of the original commit, they’ll get into a bad state where git doesn’t know how to resolve the changes. Amending commits is useful for when you are working locally and/or individually, and nobody else is relying on your work.
Staging in Patches
One way to avoid making mistakes in your commits (either by adding too much to a single commit, or including debugger statements), is by staging your changes in patches. Often times, you’ll get carried away working on a particular feature that includes a lot of code changes. Instead of having to stop and commit regularly, you can allow yourself to continue working through the entire feature - then break up your changes into smaller, more accurate commits when you’re done.
This can be accomplished by staging your changes in patches. Instead of doing a git add ., which stages all of your changes, you can run git add --patch.
This will walk you through each chunk of your changesets and ask you if you want to stage them or not. This is a good way to review your code before committing it, and make sure you keep all changes relevant to each commit.
Git will automatically determine how to separate your changes into “chunks” so that they’re readable and manageable when looking at them in the terminal. With each chunk, you will get a prompt that looks like this ‘Stage this hunk [y,n,a,d,/,j,J,g,e,?]? ? Each letter corresponds to an option you can select to perform an action on that particular hunk:
- y - stage this hunk
- n - do not stage this hunk
- a - stage this and all the remaining hunks in the file
- q - quit; do not stage this hunk or any of the remaining ones
- d - do not stage this hunk nor any of the remaining hunks in the file
- g - select a hunk to go to
- / - search for a hunk matching the given regex
- j - leave this hunk undecided, see next undecided hunk
- J - leave this hunk undecided, see next hunk
- k - leave this hunk undecided, see previous undecided hunk
- K - leave this hunk undecided, see previous hunk
- s - split the current hunk into smaller hunks
- e - manually edit the current hunk
Interactive Rebasing & Squashing
In the effort to be committing tiny changesets very frequently, sometimes we can commit too much, and we want to go back and fixup our messages and history before we submit a pull request. For example, maybe you are making changes to your README file, and you keep going back and noticing more typos and formatting issues that need to be fixed. Every time you notice one, you make a new commit called something like ‘Update README’ - but now you have 10 different commits that are all related to fixing up the documentation. Wouldn’t it be nice if we had caught all those errors at once and we could have just made them all in a single commit? That’s what squashing allows you to do!
Many maintainers will ask you to go back and clean up the history by squashing your commits. Squashing commits means combining all the changesets into a single commit with a relevant message. We can accomplish this by doing an interactive rebase:
git rebase --interactive HEAD~4
This command would take the 4 most recent commits in the branch you’re currently on (in reverse order), and open up a dialog to allow you to choose which commits you want to squash and/or edit:
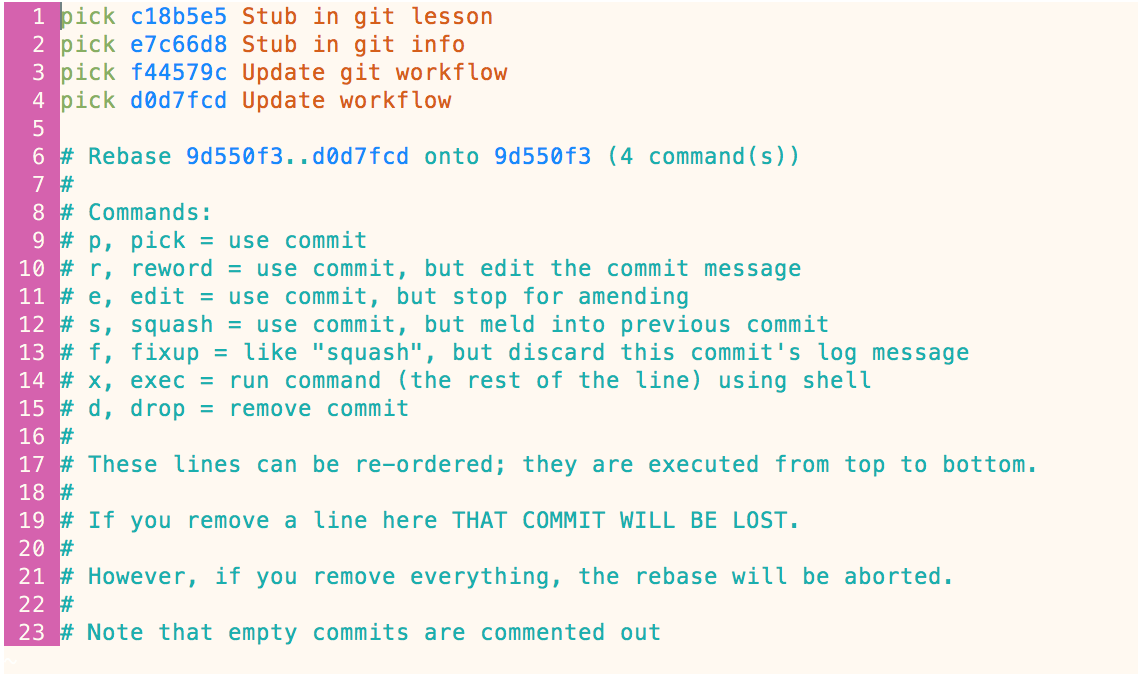
From here, you can update the text next to each commit that says ‘pick’, to tell git what you want it to do with that commit. The most common things you’ll do are:
- edit – allows you to amend that particular commit
- squash – merge this commit into the previous one
If you want to do nothing with a particular commit, just leave the text alone as ‘pick’. So, for example, in the rebase above, let’s say we want to squash the ‘stub’ commits and the ‘update’ commits. We would update this prompt like so:
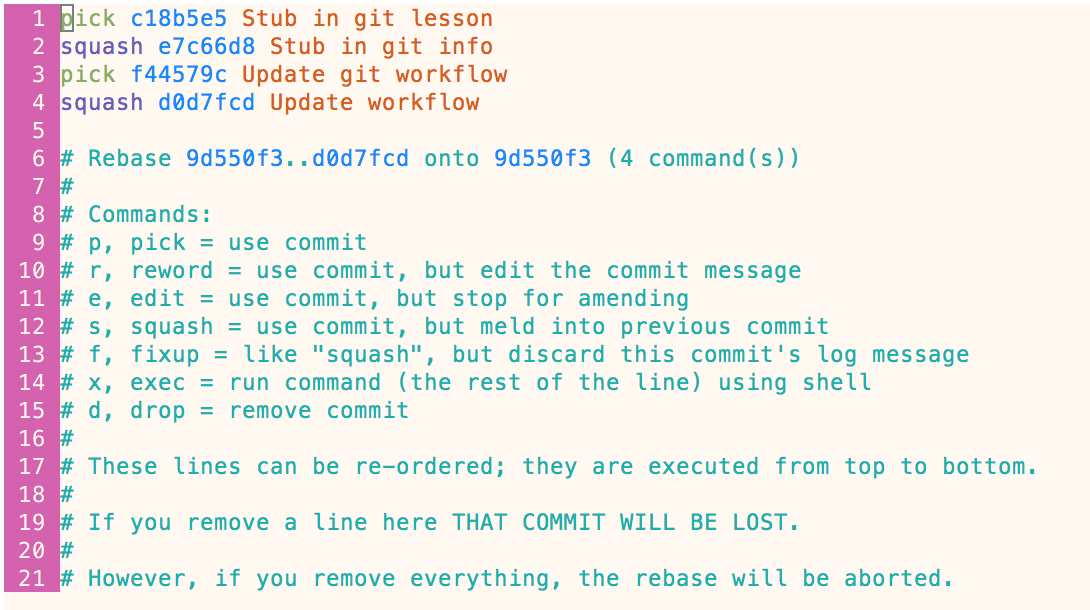
And git would run through the rebase process, stopping along the way to allow us to update the commit messages for the commits that we’re squashing.