We have updated the content of our program. To access the current Software Engineering curriculum visit curriculum.turing.edu.
Introduction to Sass
Learning Goals
- Understand that Sass has two syntaxes: SASS and SCSS
- Understand and apply the basics of Sass to follow the principles of DRY
- Speak to the pros and cons of using a CSS Preprocessor
Vocab
CSS Preprocessora program that lets you generate CSS from the preprocessor’s own unique syntax. It extends the default capabilities of CSS. Examples include: Sass, LESS, Stylus and more.Compilerconverts our preprocessed code into css code so that the browser can understand it. Examples include: Webpack, Node-Sass, Gulp-Sass and many more!
Warm Up
Before diving into SASS, the history behind it, and some of the tools it provides for us, reflect in your notebook the following:
- In past projects, how have you organized / refactored your CSS to follow the DRY principle?
- Has anything been frustrating about organizing your CSS? If so, what?
Intro to Sass
Sass stands for Syntactically Awesome StyleSheets. Sass allows you to add more advanced syntax - like variables and functions - to your stylesheets.
Some background on Sass
Sass was originally part of another preprocessor called Haml. It used no curly braces or semi-colons, and the syntax adhered to strict spacing and indentation rules. Like so:
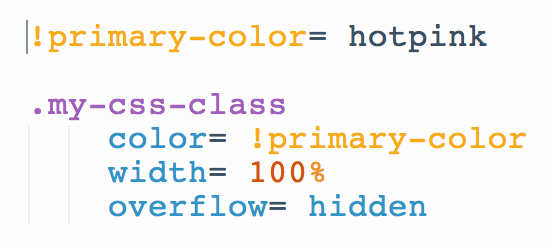
With this version, variables were assigned using ! and CSS styles were defined with =. Pretty different from the CSS you’re used to using now.
Developers liked the additional control we had over writing our stylesheets, but wanted a syntax more similar to vanilla CSS. This is where SCSS comes in.
SCSS
SCSS stands for Sassy CSS (…seriously). In May, 2010 SCSS was introduced with more recognizable syntax.
Although you may see the Sass syntax in the wild, movement has shifted significantly toward SCSS for several reasons:
- All modern CSS is valid SCSS. That means that you can rename an entire
.cssfile.scssand nothing will yell at you. This is not the case for pure Sass with the.sassfile extension. - There are no strict rules about indentation. There are still best practices, and if your indentation is all over the place you’ll make your teachers cry, BUT through our tears, your stylesheet will still function properly.
Note
For our purposes here, be aware that we will be working strictly with the SCSS syntax when we are working with Sass, AND when most people say “SASS” they are talking about SCSS.
Sass in Action
Our browsers do not understand Sass, or any of the css preprocessors! In order to be able to use Sass in our code, we need something to turn our Sass code into CSS code so that the browser can understand it. One tool that compiles our Sass (among other things) for us is Webpack!
In Groups
Let’s start exploring some Sass code! Check out one or both of the following codepens. What is similar to the CSS you know and love? What’s different?
Why would we use Sass?
CSS in large apps can get unruly. Making changes to these large apps is tedious and extremely error prone. Sass makes it easier to change colors, fonts, and other properties by keeping your code DRY. This is the one of the key principles of Sass (and in most programming) - DO NOT REPEAT YOURSELF .
Some of the cool tricks include:
- defining variables that can be peppered across multiple CSS files
- nesting elements to visibly reflect the HTML element relationships
- using math equations to adjust sizes and values
- adjusting colors using more intuitive language like “darken” and “lighten”
- bundling groups of styles together to easily reference throughout your CSS
Variables
One of the most obvious and immediately useful features of Sass is the ability to define variables to store values such as colors. Changes made in one place will be reflected anywhere the variable is referenced.
Similar to JavaScript, variables can hold a variety of data types: numbers, colors, strings, booleans, lists (array like objects), and maps (data structures that are key/value pairs).
Variable Syntax
Variables are defined by a $ immediately preceding the name of the variable (like jQuery), and a colon separating the name of the variable from the value.
$primary-color: lime;
They can then be used anywhere in your stylesheet in place of that style. If I wanted all of my paragraph tags to have this color and my buttons to have it as a background color, my selector would look like this:
p {
  color: $primary-color;
}

button {
  background-color: $primary-color;
}
It’s also nice to avoid typing long, specific styles more than once. Instead we can reference a semantically logical variable.
$frilly-font: "Fantasy", cursive;
$main-font: "Open Sans", sans-serif;

$button-slide-transition: width 2s, height 2s, background-color 2s, transform 2s;

.main-content {
  font-family: $main-font;

  button {
    transition: $button-slide-transition;
  }
}
Note
CSS can now support variables without the use of a preprocessor. In fact, there are a lot of compelling arguments out there regarding the fact that native variables in CSS are more powerful and flexible than the variables that you get with Sass. However, it’s important to note that if you are only using a preprocesser like Sass for the variables, you’re not using it right. Here is a good article to read more about the differences between CSS and Sass variables.
Paired Practice
Fork a copy of this codepen sandbox page and work on the following:
- Take note of which styles get reused, and work with a partner to add in some variables.
Nesting
Nesting makes representing relationships between elements in HTML possible in CSS.
For example, if you were writing pure CSS and wanted to target an anchor tag that was within a navigation element that was within a particular header tag, you can wrap the elements inside of each other to show the same visual hierarchy that you are used to seeing in your HTML:
Sass Nesting Example
$grey-dark: #2f3640;
$grey-light: #dcdde1;
$red-dark: #FF0000;

header {
  color: $grey-dark;

  nav {
    background-color: $red-dark;

    a {
      color: $grey-light;
    }
  }
}
CSS Output
header {
  color: #2f3640;
}

header nav {
  background-color: #ff0000;
}

header nav a {
  color: #dcdde1;
}
Use nesting with CAUTION
Be aware that having too much nesting can be a problem - resulting in hard to maintain CSS that is overly specific (remember specificity?). Try to avoid excessive levels of nesting unless absolutely necessary.
Nesting & Pseudo-Selectors
A common scenario, when nesting is a good option, is when dealing with pseudo selectors. This makes it very transparent which element’s behavior is being targeted on a particular action.
To target a parent element and apply a pseudo selector, use &:pseudo-selector, as in the following syntax:
a {
  color: black;

  &:hover {
    color: pink;
  }
}
Paired Practice
- Revisit your Sass Sandbox Codepen and add in some nesting
- What other situations can you think of where nesting could be beneficial?
Partials and Importing
One of the main benefits of Sass is having the ability to split your codebase across several CSS files without impacting PERFORMANCE - which brings us to the use of @import with Sass.
@import in CSS
You can have multiple files and import them in CSS, but the use of this at-rule is typically a code smell/bad practice. It blocks parallel downloads of CSS files (each time you use @import it creates another HTTP request).
@import in Sass
In the world of Sass, the @import directive works differently - which is important to know. Although @import is still used to require/import other stylesheets into other files, Sass will simply combine imported sheets into one final CSS file that is served to the browser, making it so multiple HTTP requests aren’t made.
- Note: Adding an
@importfor the same file more than once will still cause performance issues.
A note about @import
2020 Update: SASS no longer encourages developers to use @import and they will gradually phase it out over time. You can read some of the reasons here in the docs. Instead they encourage you to use @use. This fixes some issues, and gives us new, exciting features. With @use, the files are only imported once by default, no matter how many times you add it with @use. We get namespaces that help us to know where our imports are coming from. Here is a helpful article with more information on the features @use brings.
Generally, your structure will have the following:
- Partial files that have an underscore prefix
- A main file where you will be importing these partial files
// _variables.scss

// Colors
$favorite-text-color: chartreuse;
$gray-link: #aaa;

// Fonts
$frilly-font: "Fantasy", cursive;
$main-font: "Arial", "Helvetica", "Copperplate", sans-serif;

// Transitions
$button-slide-transition: width 2s, height 2s, background-color 2s, transform 2s;
// index.scss
@import 'reset';
@import 'variables';

@import 'Header';
@import 'Button';
@import 'Author';
@import 'Story';
@import 'Stories';
/*...*/
/*...*/
Paired Practice
- How does
@importwork in Sass? How is it different from the@importat-rule used in CSS? - In your Sassy Sandbox, find two different ways to set up your file structure with Sass. Separate this code out with comments.
- What other files might make sense to have in a project?
Mixins
A mixin allows you to define a set of styles that you want to reuse throughout your codebase. It also gives you the option to pass in values that make your mixin more flexible.
To use:
- You name them with
@mixin name(optional arguments) { style }. - To include them you use
@include name(optional arguments).
SCSS
// Example
@mixin rounded-corners($radius) {
  -webkit-border-radius: $radius;
     -moz-border-radius: $radius;
      -ms-border-radius: $radius;
          border-radius: $radius;
}

@mixin centered() {
  display: flex;
  justify-content: center;
}

.box {
  @include rounded-corners(50px);
  @include centered();
}
CSS Output
.box {
  -webkit-border-radius: 50px;
  -moz-border-radius: 50px;
  -ms-border-radius: 50px;
  border-radius: 50px;
  display: flex;
  justify-content: center;
}
Note
Just like variables, common convention is to place your mixins in a partial file that is separate from other styles.
Turn and Code
In your Sassy Sandbox, implement the following mixins:
- Create a mixin called
level-one-headerthat has a font size of 32px, a font weight of 800, and a color of your choice. - Create a second mixin called
level-two-headerthat specifies a font size of 24px, a font weight of 300, and a color of your choice. - Create another mixin on your own
Media Queries
But what about media queries? There are a lot of different approaches that you can take. Here’s a good blog post that walks through setting up responsive mixins for each component.
One thing to note is that we can nest our media queries and use variables.
Colors
Sass offers built-in color functions that allow you to adjust defined color values with ease. Most of the color functions operate by manipulating a single color value - while others can be used to combine colors in different ways.
Chances are that you’ve defined most (if not all) of the colors in your project using the predefined color names from the browsers, hex codes, or RGBA. This is all well and good; however, it fails to give you the same control over your colors as when you use HSLA.
Reviewing how you can define colors in CSS
RGBA
Stands For: Red, Green, Blue, Alpha(Opacity)
Syntax: rgba(0-255, 0-255, 0-255, 0-1) or rgba(0-100%, 0-100%, 0-100%, 0-1 )
Example: rgba(255, 0, 0, 1) or rgba(100%, 0, 0, 1) (red)
Each value takes either a integer from 0-255 or a percentage from 0-100% representing the saturation/intensity of red, blue and green respectively, and blends them together.
Hexadecimal Code
A form of RGB notation written as pairs of hexadecimal values.
Syntax: #rrggbb or #rgb.
Example: #f00 or #ff0000 (red)
ProTip: Shorthand comes from duplicating each character. So #f00 (red) expands into #ff0000, or #fb0 (yellow) expands to #ffbb00;)
HSLA
Stands For: Hue, Saturation, Lightness, Alpha(Opacity)
Syntax: hsla(0-360, 0-100%, 0-100%, 0-1)
Example: hsla(0, 100%, 50%, 1) (red)
Hue: A value from 0 to 360 indicating the value of RGB on a color wheel.
Think of the letters RGB distributed equally clockwise around a circle. (R)ed is at 0 or 360, (G)reen is at 120, (B)lue is at 240.

Saturation: A percentage of the grayscale from 0% (no color) to 100% (full color).
Lightness: A percentage of white value from 0% (completely dark) to 100% (completely light); Standard colors default to 50%.
Alpha: A decimal value indicating transparency from 0 (invisible) to 1 (completely opaque).
Note
Using RGBA to try to adjust lightness or saturation can be impractical and frustrating. In order to do this, you would need to shift each of the color channels - which would likely change the original color (hue). This matters most when you are looking to make color variations (fading, gradients, etc) from the same color. Using HSLA is a lot more predictable than RGBA, as seen in this demo tool.
Fun fact about Light
Light is an important piece of the design puzzle when it comes to working with color - something that is true for all mediums of art and design, including the digital mediums we use as FE developers.
Group Practice
In small groups, research the following built-in color functions. Reference the descriptions below, the Sass documentation on color functions, and the examples you are given. Make sure to play around with the code in a codepen - are there differences in using hex, rgba, and hsla? Why is this function relevant? How could you see yourself using these in practice?
- complement()
- mix()
- lighten/darken()
- desaturate/saturate()
Finished early? What other useful color functions can you find?
Summary
We’ve covered the basics (and more!) of Sass, but Sass can do a lot! If you’re looking for more, check out the Sass documentation for things like functions, operators, more at-rules, etc.
CSS can be messy. If you’re looking for more ways to think about organizing your styles (CSS or SASS), look into some of the modular architecture methodologies, like OOCSS, BEM or SMACSS.
Exit Ticket
We’ve talked about a lot of the strengths/advantages of using Sass without acknowledging that there are downsides. Given what you know, make a case for possible disadvantages of using Sass