We have updated the content of our program. To access the current Software Engineering curriculum visit curriculum.turing.edu.
JS: Event Bubbling and Delegation
Learning Goals
- Understand and describe propagation and bubbling
- Understand and apply event delegation
- Utilize the event object
Vocabulary
Event HandlersFunctions that will run when an event happensEvent PropagationRoughly, the order in which different DOM elements are notified of an eventEvent CapturingPart of the event propagation model wherein listeners are fired from the top the DOM tree, downEvent TargetingPart of the event propagation model wherein listeners are fired on the source of the eventEvent BubblingPart of the event propagation model wherein listeners are fired from the target of the event, upEvent DelegationThe process of using event propagation to handle events at a higher level in the DOM than the element on which the event originated
Event Basics
Events are happening all the time in the browser. When the browser has finished loading the page, an event is fired. Every time the user moves their mouse, hovers over an element, clicks or taps, submits a form, presses down on a key or takes their finger off that key — an event is fired. Some of these events are very easy to spot when they occur (e.g. the user clicks on a hyperlink), but many go by completely unnoticed.
It is, however, possible for us to use JavaScript to set up handlers for events that interest us. Our handlers wait patiently on a DOM node until the event they’re waiting for is fired. Then, they spring into action, running an appropriate function to respond to the event as required, or whatever else you deem appropriate.
For a review of how to set event handlers, please refer to the DOM Manipulation with JavaScript Lesson
The Problem with Dynamic Elements
A common obstacle that many JavaScript developers struggle with is understanding the timing in which they bind event listeners to DOM nodes. When we add event listeners to DOM nodes, we’re only adding them to the nodes that are currently on the page. We are not adding listeners to nodes that may be added to the page in the future.
Experiment
Clone this repository to your
local machine, and open up example1/index.html in your browser. Additionally, open up the example1/script.js and example1/index.html in your text editor, side by side.
Your Turn
You should see three buttons labeled “Click me!” as well as a button for adding new buttons to the page.
- Spend some time reading through the code in script.js. You might want to add some of your own pseudocode.
- After you’ve read every line, ask yourself:
- Which elements are we selecting with
querySelector’s? - Which elements are we adding
eventListenersto? - What happens when the user clicks the
addNewButton?
- Which elements are we selecting with
- In the browser, click each of the “Click me!” buttons and verify that each one fires an
alertnotifying you that the button has in fact been clicked. - Add an additional button using the “Add a new button below.” button.
- Click on your new button and observe the results.
What did you notice?
The event listeners are only bound to the buttons that were present when the page code was first loaded.
The buttons we added later (using the createButton function) were not around when we added the listeners. Even though the newly created buttons are given the same class name that we are targeting with the eventListener, they didn’t exist at the time the listeners were attached, so they aren’t able to listen for those clicks, and thus they can’t call any functions at all.
Could we modify the function that adds new buttons so that it adds an event listener to the element before it appends to the page? Yes we can, but unfortunately this isn’t preferred for reasons below.
Event Propagation
Event propagation is an important yet misunderstood topic/term when talking about events. Event propagation is an overarching term that includes the three different phases of DOM Events: capturing, targeting, and bubbling. Event propagation is bi-directional (starts at the window… goes to the target… and ends at the window) and is often improperly used as a synonym for event bubbling. Every time an event occurs, event propagation is occurring behind the scenes.
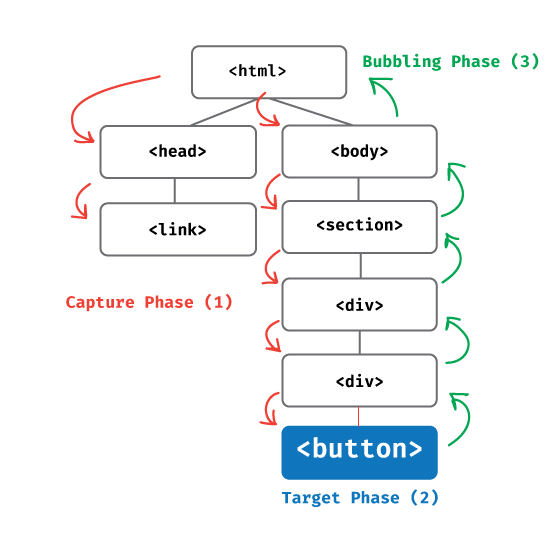
- Event capture phase - When an event occurs in the DOM, notification of the event is passed starting at the top of the DOM tree and passing down through all parent element nodes all the way to the target node where the event occurred.
- Event target phase - After the capturing phase occurs, the Target phase occurs. The target phase only includes a notification of Node where the event took place.
- Event bubbling phase - This is the final phase to occur, although many people think this is the first phase. In the bubbling phase a notice is passed from the target Node up through all of the parent Nodes all the way back to the top root of the DOM.
- OK but what is actually happening during these phases? When an event occurs - JavaScript/the browser start at the ‘top’ of the DOM tree then looks down/zooms into the target (whatever element the event occurred on), then looks back up/out element by element to see if there are any event listeners/handlers that need fired
Event Bubbling
Now we’ve talked about the fundamentals of events, let’s turn our attention to the event bubbling phase, which refers to the ability of events that occur on DOM nodes to “bubble up” and also apply to ancestors of those nodes.
But what about the capturing phase?
Many people question why more attention isn’t paid to the capturing phase. Simply put, it’s VERY unlikely that you’ll have to use it. IE < 9 uses only event bubbling, whereas IE9+ and all major browsers support both.
Legend has it that back in the day, Netscape Navigator and Internet Explorer had different, incompatible ways of propagating events to multiple handlers; Netscape “captured” while Internet Explorer “bubbled.” W3C has very sensibly decided to take a middle position in this dispute. According to the W3C event model, any event taking place is first captured until it reaches the target element… and then bubbles up again.
Pair Practice
Using your repo from earlier, open example2/index.html for this pair practice, and modify script.js
Add the following lines below your query selectors:
  grandParent.addEventListener('click', function() {
    console.log('Grandparent');
  });

  parent.addEventListener('click', function() {
    console.log('Parent');
  });

  button.addEventListener('click', function() {
    console.log('Button');
  });
- Talk through what each line is doing.
- What is the result when you click on the
button? Theparent? - What do you predict will happen when you click the
grandparent?
What is happening here?
You may have noticed that the event listeners on a parent element are fired whenever the action occurs on one of its children. Even though the click happens on the child node, the parent and grandparent nodes still “hear” it. This just means that when you add an event listener, it ‘listens’ for events on the entire element/area, including all the elements that may be nested inside that element (it’s children).
When an event occurs, the browser checks the element to see if there are any event listeners registered. After it checks the element where the event occurred, the browser works its way up the DOM tree to see if any of the parents have a listener registered, then grandparents, and so on. It checks every element all the way up to the root. This process is known as event bubbling.
The Event Object
Sometimes inside an event handler function, you might see a parameter specified with a name such as event, evt, or simply e. This parameter holds the event object, and it is automatically passed to event handlers to provide extra features and information. In the case of the click event we’ve been using as an example, this is a MouseEvent. You can visit the MDN page for Event to explore the full list of supported event types.
Each type of event supports a number of different properties. MouseEvents contain information about the x and y coordinates where the mouse was clicked. KeyboardEvent has information about which key was pressed. The target property on the Event object can be useful during the event bubbling phase.
Pair Practice
Modify your code from earlier so that instead of logging a description of each element where an event was triggered, log the event object.
- What other properties on the event object look particularly useful or interesting?
- Dig into the event’s
targetproperty. Look for the following properties: className, classList, id- Look for the target’s
parentNodeproperty. Look for that parent’s parentNode. Look for that parent’s parentNode. How far up the DOM tree can you dig into the parent’s parents? - Look for the target’s
childNodesproperty andchildrenproperty. How far down the DOM tree can you dig into the children’s children?
- Look for the target’s
- Now update your
console.logto logevent.target. Click the grandparent, parent, and then button. What do you notice about the target? Do you see any similarities with the diagram we drew out earlier?
Event Delegation
With the understanding of event propagation and the event object, we can now go back to the original issue with handling events on dynamic content. Rather than manage the addition and removal of event listeners, there is a methodology you can use called event delegation.
In event delegation, we take advantage of the fact that events bubble in the event loops by setting an event listener on one parent. This event listener analyzes bubbled events to find a match in its child elements. Event delegation is one of the most helpful patterns for DOM events. It simplifies things and can save memory since there is no need to add many handlers.
The steps:
- Put a single handler (event listener and function) on a parent container/area
- In our function, check the source element (whichever element the event directly occurred on) using
event.target[some property](whatever property we can use to identify the element(s) we care about) - If the event happened on an element that we care about, THEN ‘handle’ that event (aka, do all the behaviors outlined in the code in the function). Remember to use console.log(event) to figure out what info you have to work with for whichever element. Remember that the ‘target’ will depend on where/what you ‘click’ on.
Your Turn
var parent = document.querySelector('.parent');

parent.addEventListener('click', function(event) {
  if (event.target.className === 'click-me') {
    // do your action on your 'button' or whatever it is you're listening for
  }
});
- Add the above to
example3/script.js - What should happen inside of your conditional? What function should be called when a user clicks on any button?
- Run the code with
open example3/index.js
Applying Event Bubbling & Event Delegation In Your Projects
- Think about which larger container/area/parent you should put your listener on
- Listen to this whole area (and everything in it) for the specific type of event. Ex. ‘click’
- Think about which element(s) you actually care about being clicked on
- How can they be identified? Do they have a specific class/id we can look for?
- Think about what you want to happen when one of those elements-of-interest is clicked on
- What should happen?
- Which element should it happen to? The one that was clicked or a relative?
- How can you tell JS which element you want the thing to happen to?
Summary
Using your journal, take a few minutes to answer the following:
- What are three things that you learned today?
- What are two things that you still have a question about?
- What is one thing you can take from this lesson to apply to your current projects?
Resources
- A very detailed piece that describes event order can be found here