We have updated the content of our program. To access the current Software Engineering curriculum visit curriculum.turing.edu.
Introduction to Git and GitHub
Prework:
The first time you start using Git and GitHub, understanding how it all works can be a lot to take in. Luckily, one of the staff at Turing recently wrote a blog about what Git is and why it is so important in the developer community.
CodeCademy also has a great walkthrough for Git on how the entire process works and some of the commands you’ll commonly use. Please complete Section 1: Basic Git Workflow (up to, but not including ‘Manhattan Zoo’), before the lesson.
Learning Goals
In this lesson, you will learn how to:
- Use a version control system (in this case, Git)
- Start a project with Git
- Make local version contributions to a project using Git
- Use a version control system (Git) in conjunction with an online/remote repository (GitHub)
Vocab
Version Control System (VCS)A tool that keeps track of the differences in code bases at different points in timeGitThe most commonly used VCSGitHubA service/website that allows people to host git repositories onlineRepositoryA collection of code managed by git. Tends to be the folder your source files are inWorking AreaWhere untracked and unstaged files liveStaging AreaWhere staged files liveCommitA snapshot of what your code looked like at a particular timeRemoteRemote, as in, a remote repository. As in, not a local repository. A remote is a repository that’s stored somewhere that’s not your local machineFeature BranchA branch created to hold a new feature while it’s in development, as opposed to committing parts of an unfinished feature on masterPull RequestA request to merge a branch into the default branch (usually master). Allows for control of the merge process as well as providing a place to review changes
Git
Some Context: What is Git, and why should we use it?
Git is a version control system (VCS). VCSs keep track of the differences in file systems at different points in time. We interact with Git from the command line. We use Git to commit changes to our project. These commits serve as snapshots in time (or versions) of the project. A project that uses Git has a complete history of the code changes made throughout its existence, which can be powerful if you want to look at the origin of a bug, or if you want to revert to an old version of a project. Git is used throughout the software development community, not only for web development - it gives developers a robust way to collaborate, share, and maintain code bases.
What is GitHub, and why should we use it?
Git is NOT the same as GitHub.
Despite their similar names, Git and GitHub are not the same thing. They work together, but they are their own distinct beasts. Git allows us to save specific versions of our work in a local repository on our computer. GitHub is an online Git project repository hosting service, which means it holds the directories that contain all the files and folders that make up our projects.
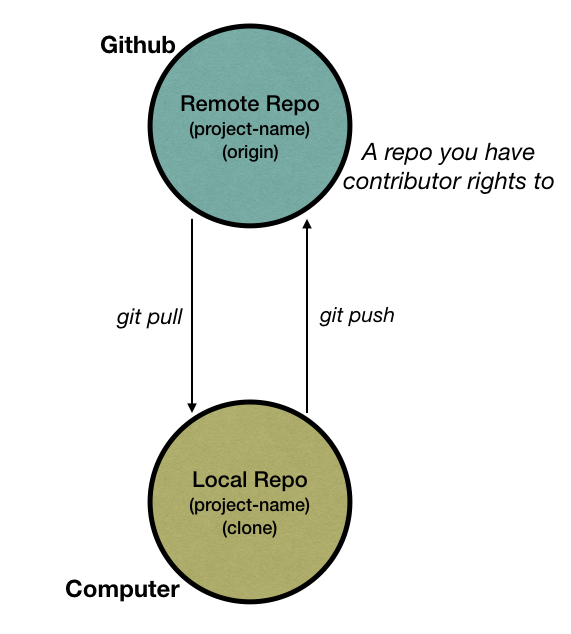
GitHub also allows teams to work seamlessly together (most of the time) on the same codebase. Everyone on a team can pull down a local version of the repo on GitHub, and then, as work is done, the code is committed and pushed from the developer’s local repo and added to the repo on GitHub.
Before we start
In your journal:
Think back to how you used git and github for dog party - what did you notice? Have you tried using Git and GitHub for number guesser? What questions have come up?
Discuss with your number guesser pair. The person with soonest birthday should start.
An example journey through Git and GitHub
At this point, you will not need your computers. Please take notes as the instructor walks through a basic Git and GitHub workflow.
In addition, you have a set of post-it notes and a piece of chart paper on your table.
Write each command (without the definition) on a post-it note as we walk through this workflow (one post-it for each command per table). Don’t worry about the chart paper for now.
Initialize git locally (git init)
Inside of a git-and-github-intro directory, in the terminal, type git status. You should see a line that looks something like this:
fatal: Not a git repository (or any of the parent directories): .git
By running the command git status, you are essentially telling the current directory “hey, go find a directory called .git, and find out the status of tracking my files.”
The error we get says that we haven’t created a .git directory, which means the directory we’re in is not a git repository, and the terminal can’t do what you’re trying to ask of it.
For the terminal to recognize the command git status and give you useful information, we must initialize git for this specific directory.
Type git init into the terminal.
What does the output say?
Initialized empty Git repository in /Users/username/whatever/directory/.git/
Now type git status in the terminal, and you should see a different message. Now Git is tracking where you have made changes within this directory. We’ll get into the status in a bit.
On branch master

No commits yet

nothing to commit (create/copy files and use "git add" to track)
Additionally, if we use ls -a to look in the directory, we can see a .git hidden directory. The .git directory is not something you need to worry about at this time, and you will likely never modify it. It is used by Git to keep track of your change history (commits) - more on that later.
Three areas where code lives (within git)

- Working Area
- Where unstaged files live
- Staging Area
- Where files that are going to be a part of the next commit live
- The Repository
- The files git knows about!
- Contains all of your commits
Add a file
Let’s make this a real project and actually add some content! Add a readme file from the terminal using touch README.md.
Check status (git status)
We’ve added a file, and by doing that we’ve made changes in our directory. Does Git know about these changes? Let’s check by checking the status of our repository using the command git status.
Now we see some new information! There is a section of this message that says “Untracked files:” with something that looks familiar - the name of the file we just created.
On branch master

No commits yet

Untracked files:
  (use "git add <file>..." to include in what will be committed)

	README.md

nothing added to commit but untracked files present (use "git add" to track)
Add file to staging area (git add)
If in the future we want to add these changes to our repository (and we do), then we need to add this file to the “staging area”. To add the file to the staging area, use the command git add README.md. This command is saying to add the file named README.md to the staging area.
If we wanted to add all of the untracked files or changes, then we could use the command git add .. The dot . after add says add all untracked files in this repository.
Let’s check the status of our Git repository again: git status. Now we see the same file name under the heading “Changes to be committed:”.
On branch master

No commits yet

Changes to be committed:
  (use "git rm --cached <file>..." to unstage)

	new file:   README.md
Commit the file (git commit)
Now that we have added the file to the staging area, we are ready to commit the file. Committing the file will “save” these changes to the Git history in this repository. Think of this as a snapshot of our directory (or a snapshot of our project).
Commit the file using the command: git commit -m "Initial commit"
The -m part of the command says we want to add a message to this commit. ALWAYS add a message. The message is information that you (or other developers) can use at a later time when you want to look back and see what changes were contained in a commit. We will view this history later.
The commit message above, Initial commit is a very common first commit message, used by developers everywhere when a project is first created. Best practice is to set up your github repository as soon as possible so you can start tracking changes, so this typically happens when you have your very basic file tree ready to start adding code.
A note on commit messages
A git commit message is the best way to communicate context about a change to other developers and your future self.
Basic rules of a decent commit message:
- Capitalize the subject line
- Do not end the subject line with a period
- Use the imperative mood in the subject line
- Explain what and why vs. how
If we check the status of the repository now (git status), then it tells us that there is “nothing to commit” because all of the changes we have made in this directory have been committed.
Look at your commit history (git log)
git log allows us to see our commit history locally.
We can also check a condensed version of that report by running git log --oneline.
Turn and Share
Now that we have worked through the basic git workflow, turn to someone you’re sitting next to and explain what we just did and why each step was necessary.
Incorporating GitHub
Create repository on GitHub
Now let’s create a repository on GitHub. This repository will sync with your local repository - the code you develop locally will be synced with this online repository so you can share code and collaborate.
Go to your GitHub profile. Click the green button called New Repository.
Under “Repository name”, let’s give this the same name as the directory we made locally. The convention is to keep these names the same to avoid any confusion.
Create it without a README.md, since we have already created one.
Once it’s created, we can follow the instructions under ‘… or push an existing repository from the command line’ - the steps are broken down below.
Add remote (origin) to local repository (git remote)
Now that we have an online (remote) repository, we have to connect it to our local repository. Git has a concept of a “remote”. The remote is a place where we can push our code externally (like the cloud - GitHub).
The command to add a remote is, surprise, git remote. To add the remote, the generalized command is git remote add [name-of-remote] [address-of-repository]. Now we have to fill in these fields.
The name of the remote, by convention, is typically origin. If we go to the repository on GitHub, then the address is also given to us. For instance, my repository address is git@github.com:kalikoze/git-and-github-intro.git.
So all together, enter the command git remote add origin git@github.com:kalikoze/git-and-github-intro.git into the terminal.
The local and remote repositories are now linked! (we can confirm that is the case by running git remote -v)
Push up initial files (git push)
Finally, we need to push up our initial code from our local repository (aka your computer), to the remote repository (aka GitHub.com).
git push -u origin master
Note the -u (also known as set upstream) flag only needs to be used on the initial push, all subsequent pushes can leave it out.
Go back and visit the repository on github.com and refresh the page. If all went well you should see your files.
On branch master
nothing to commit, working directory clean
Now, our initial setup is complete. We have successfully hosted our site, at this point in time, on GitHub
Getting into our continuous workflow
The master branch
When we type git status, part of the message we get back is “On branch master”. Let’s discuss the what git means by a “branch”, and what is “master”?
In Git, there is this concept of branches. They represent a line of development. The master branch is typically the branch where the code works without known bugs.
Ideally, we want to keep the master branch “clean” of bugs. So if we want to write new code, then we can branch off of master.
The initial commit should be the only commit that you commit on and push directly to master.
When you branch off of the master branch, that new branch can serve as a sandbox for development where you can make changes or experiment with a research spike without affecting the master branch.
Creating A Branch
(git branch and git checkout)
Before we make a new branch, let’s check what branch we are currently on.
Command to identify current branch: git branch
This command lists all of the branches you have made and also tells us what branch we are on.
* master
We only have the default branch master right now, so it lists only master. The * denotes what branch we are currently on. In this case: master.
Let’s make a new branch! The command to make a new branch is git branch [branch name].
Type git branch add-readme-info in the terminal. Now check git branch again. What do we see? We see our new branch name! However, the * is still next to the master branch.
add-readme-info
* master
To change to our new branch, we need to “checkout” the branch.
Let’s checkout the new branch using the command git checkout add-readme-info. To checkout any branch, the command is git checkout [branch name]. Now if we enter git branch, the asterisk shows we are on the new branch we just created.
* add-readme-info
  master
Pro Tip: We can use the command git checkout -b [branch name] to both create and change to the branch name specified.
Make changes on the new branch
Now that we’ve checked out the new feature branch, we can start making changes on the branch. Let’s add some content to our readme.
# Git and GitHub Intro
## Git and GitHub are the bees knees!
Add the file to staging, and commit the changes: git add README.md and then git commit -m "Add level 1 and level 2 headings to readme".
Now push your changes to the remote git push origin add-readme-info
Two ways to merge
Merging a branch means that you are updating one branch with another branch’s changes.
Merge work locally (git merge)
To merge changes locally between branches, you should first move to the branch you want to update. Then run the command git merge [branch you want to merge changes from]. In our case, we want to make sure that we have all of the latest changes from master.
Therefore we can run git merge master. Since our master branch has not been updated while we’ve been working on our feature branch, it will return:
Already up to date.
This step is most important when working on a team. It is a safeguard, to ensure that our feature branch has all of the latest changes from master, before we create our pull request.
Note Ideally you are only merging the changes from master into features branches locally and merging changes from feature branches into master via pull requests
Create a pull request on GitHub (PR)
On the GitHub repository page, there is now a notification of a recently pushed branch. On the right side of the notification, click Compare & pull request.
Now we can create a pull request (PR). A pull request is a formal way of merging code from one branch to another with the idea that someone can come in and review the code before it is merged. Often this is an opportunity for a “code review”.
Edit the title of the pull request, if necessary, and add some more content in the description box about what you changed and why. When you are done describing the changes, click Create pull request.
Note I can continue to make changes to my pull request until it gets merged.
Let’s add another file to our project called checklist.md.
Inside of that file, let’s create a very important checklist.
* [ ] make tacos
* [ ] eat tacos
* [ ] be happy
Let’s also add another line to our readme file.
Note Since we’ve made a change to our existing readme, we can check what change has occurred using git diff
Now, let’s add, commit, and push our changes.
Merge pull request (PR)
Normally at this point, a coworker or project partner would view the pull request, make comments on the changes, and say if it should be merged or not. Since we are working by ourselves for this, our code is perfect! Let’s merge the code into the master branch.
On the pull request page, make a comment that the PR was reviewed, and then click Comment.
Now that it has been reviewed, click Merge pull request and then Confirm merge. Merged!
Our changes from our branch that we pushed up to GitHub are now merged to the master branch on GitHub.
What is going on locally?
Back in your local repository, checkout the master branch and notice the changes that were merged on GitHub are NOT on our local machine. We need to get those code changes from the remote repository so our local code is in sync.
Pull remote master into our local version (git pull)
If you haven’t already, checkout the master branch: git checkout master
To get the changes from the master branch on GitHub to our local master branch, we need to “pull” down those changes. The general command is: git pull [remote-name] [branch-of-remote-to-pull-down]
In this case, enter the command: git pull origin master
Our changes are now completely synced. The master branch locally is the same as the master branch on GitHub. We can make more feature branches, add more features, and repeat the same process!
A Typical Workflow
To summarize the example above, a typical workflow for a project tracked with Git and GitHub is layed out well here.
Your Turn: using the workflow
Individually (use your neighbors if you get stuck), use the above workflow to create a practice git repo and work through some features:
- Be sure to follow every step along the way.
- The repo should have an html file and a css file when you push its initial structure
- Work on a feature branch called
add-html-structureto add structure to your html file. - Work on a feature branch called
add-stylesthat changes the background of your page toblanchedalmond.
Your Turn: creating a flow diagram
In your group of 4, use the post-it notes you wrote commands on earlier, as well as the chart paper and marker on your table to create a visual diagram of all of the steps in the workflow we’ve been following.
Things to consider:
- What steps repeat? - what shape of diagram could be used to show that?
- What steps won’t? - should these be separate from the ones that do?
- If there are commands used in both of the above, feel free to add another post-it for that duplicate command
- What steps are useful for pulse checking? Could they exist outside of the flow as helpers?
- Add any intermittent information that you think is useful
A Note About Merge Conflicts
You might be wondering what happens if you’re working on a project with a partner and you both make changes to the same line of code. This is called a merge conflict. Merge conflicts happen when two different commits can’t be automatically merged and they need to be resolved. Conflicts can occur when you pull down from origin or when you are creating a pull request to merge to master on GitHub. In the event that this happens, you might get a message like this:
CONFLICT(content): Merge conflict in boots-and-pants.js
Automatic merge failed. Fix conflicts and commit the results.
This happens because GitHub doesn’t know what code to believe. Below is an example of what a conflict might look like upon inspection of the flagged file:
// boots-and-pants.js
 var a = 1;
<<<<<<<<<HEAD
var b = 2;
=========
var b = 0;
>>>>>>>>>39457094865893724234798326445
var d = 5;
var e = 3;
var r = 18;
The lines of code between HEAD and the set of equals signs (so in this case, var b = 2) are all of the changes you made that are in conflict. These are changes that you have made on your computer. Everything between the set of equals signs and the greater than signs followed by the conflicting commit number (var b = 0) are all of the changes from GitHub that you’re trying to pull down that are conflicting. To resolve conflicts, you have to decide which of the two conflicting lines you want to keep and then remove the HEAD, the set of equals, and the conflicting commit line.
Next steps
Mandatory:
- Practice by pushing up your Number Guesser project to GitHub.
- Read this page about pull requests to solidify your understanding.
Optional:
- To get even more practice, try completing the rest of the exercises under Basic Git Workflow at CodeCademy. Specifically, do the exercises Manhattan Zoo and SnapFit Robots, Inc. It is highly recommended that you also complete the quiz to solidify your understanding!
- Read Rules of Git Commit Messages, which goes into more detail on what makes a great commit message.